Saturday 27 July 2013

Just because it says "Christmas ornament"...

...doesn't mean you have to use it as such. 
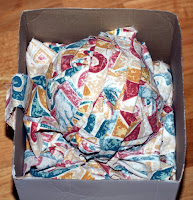
I made this decorative ball this afternoon, from pages from a European road atlas, 
following these instructions.
It looked so good hanging in my window that I think I'll leave it there.


Tuesday 16 July 2013

Crochet a basket from fabric yarn ("farn")

To continue on from my last post:


To make a basket similar to this one, you will need:

Fabric yarn. I can't give you exact yardage, but I used approximately half of what I got from the duvet cover, which was 135 x 200 cm, cut into one long continuous strip about 2 cm (4/5 inch) wide.
Scissors. 
Big crochet hook. I used a 10mm for this project, but would have used my 12mm hook if I had been able to find it.
A smaller crochet hook, e.g. a 5mm. For finishing.


Abbreviations:
slst - slip stitch
ch - chain stitch
sc - single crochet (I'm using American terms)
dc - double crochet

Beginning round A: Make a magic ring and make six sc in around it. Pull to close.
or
Beginning round B: Make 6 ch and connect with a slst into the first ch.

In both methods make sure you leave a tail of at least 5 cm in case the hole in the middle ends up too large and you need to fill it.

You will be working in a spiral, i.e. you do not finish each round with a slst but continue working sc's. To mark where each round begins, either use a stitch marker or just eyeball it from the location of the tail.

1. Make 2 sc in each ch around (12 sc).
2. Make 2 sc in the first sc, 1 sc in the second sc, repeat around (18 sc).
3. Make 2 sc in the fist sc, 1 in the next 2 sc, repeat all around (24 sc)

You now have the beginnings of a bottom for your fabric basket. To adjust the size:

Depending on how large you want the basket to be, continue by increasing the number of single sc's between sc by one for each round you make so that, e.g. you make 2 sc and then 3 x 1 sc in the fourth round, 2 sc and then 4 x 1 sc in the fifth round, and so on. This particular basket is made with a total of 7 rounds for the bottom.


You can stop after this, and you will have a trivet, or you can continue increasing the number of single sc's between the sc's with two sc's until you have a rug.

To make the sides:
Continuing in a spiral, stop increasing and work one sc in each sc until the sides are high enough for your taste. If you want the delimitation between the bottom and the sides to be less rounded and the basket more cylindrical in shape, work the first round of sc's in the back loops only.

To make the scallops:
Chain 3, make 4 dc in same sc. Connect with slst in 3rd sc from the sc you are working in. Repeat around. If it looks like you will have a gap of one or two sc at the end, adjust by connecting the last one or two scallops one sc less or one sc farther from the sc you are working on.

You can also make a handle:
Make 3 ch in the last sc worked, dc in the next sc, turn and continue this way until the handle is long enough. Then connect to the opposite side with 2 slst.

Finish off and hide the ends. The small crochet hook is good for threading ends into the finished work. Carefully snip off any frayed threads and corners that might stick out (this will mostly be on the wrong side of the piece, i.e. the inside of the basket).

Use as you please. If you chose the fabric sensibly, you will be able to throw the basket in the washing machine if it gets dirty. I'm sure I don't have to stress that this is important if you plan to keep food in it, especially food that can leave crumbs trapped in between the knots (e.g. bread) or leak stains in the the fabric (e.g. fruit).

Monday 15 July 2013

How to make fabric yarn for crochet, knitting and weaving

You may have noticed that the sock yarn I wrote about in my last post was shown reposing in a fabric basket? Well, I made that basket, and I also made the yarn. These baskets are super easy to make and you only need to know three basic crochet stitches to make them: chain stitch, single crochet and double crochet (I'm using the American terms here. Click here to see the equivalent British terms). In fact you only need to know two stitches if you can make a magic ring, and only one stitch if you can make a magic ring and want to skip the scalloped edging. (I ran into some problems with the magic ring - the fabric wouldn't cooperate and so I ended up doing it differently, but maybe you can do better).


A couple of weekends ago I sat down with an old duvet cover, a pair of scissors and a seam ripper, because I intended to use every last centimetre of the fabric. Actually, I ended up cutting off the side seams because they had white selvedges, but other than that I did use every cm.
Anyway, I tore it down into strips to make fabric yarn - and last weekend I made the basket from about half the yarn and will either make another basket from the rest, or I might make several fabric trivets or a small floor mat from the rest.

This post will be in two parts: How to make fabric yarn, and how to make the basket.


To make fabric yarn:
You can make fabric yarn out of any kind of fabric that can be torn or cut into strips, as long as it isn't unwieldy in some way, for example very stiff or thick or liable to easily fray into shreds (e.g. fake fur, some types of brocade and very coarsely woven fabrics). If you plan to make lots of it, I recommend using something that can be torn easily, because tearing is faster (and more satisfying) than cutting and for woven fabrics means there will be less fraying than if it is cut. I used the aforesaid duvet cover, which was 100% cotton, but linen and rayon and blends thereof will also tear easily (as long as it isn't stretch fabric, in which case I'm afraid you'll have to use scissors).

If you plan to use velvet, felt, fleece or knit fabrics, e.g. jersey, you will need to cut it. You don't even have to be content with making fabric yarn: you could just as easily make plarn or use old pantyhose and/or nylon stockings. I, however, am going to give instructions for making fabric yarn from tearable fabrics.

Selvedges.
Folks: This is what happens when you always wash your duvet
covers right side out: lint collects along the seams
New fabrics will inevitably have selvedges. Often they are the same colour as the fabric, in which case just use them as part of the yarn, but if they're a different colour you may want to cut or tear them off and discard them or use them for something else.

If you're making this a true recycling project as I did, e.g. by using a duvet cover, a bed sheet or an old tablecloth, chances are your fabric will have hems and possibly selvedges (which will generally be a part of a hem). For selvedges, see the above advice, but if there are hems you need to rip out the seams and unfold the hems (you might need to iron them out).

It is generally best to cut the fabric generously, because the narrower the strips are, the more they will be liable to tear when you start working with them. For this project, the strips were about 2 cm (3/4 inch) wide. If you use the imperial measurement system, just round that up to an inch. Measure the width of the first strip (I use the width of two fingers as a gauge) and make a cut about 5
cm long. Then firmly grip each side of the cut and start tearing. Stop around 2 cm from the end and make another cut 2 cm from the first tear and repeat until you run out of fabric. You can trim the points at the turns, but they will generally disappear into the crocheted piece and those that don't can be trimmed after the fact. (If you plan to use the fabric yarn for weaving, I recommend rounding the points, as they will be much more visible than in crochet).


This is about 1/4 of the duvet cover.
The whole thing would have made a ball
as big as a basketball.
Now it's up to you whether you wind the fabric yarn into balls or not. If you want balls, you may want to shorten the strips because yarn made from a very large piece of fabric, e.g. a large bed sheet, will give you a ball large enough to be difficult to work with (they look cool, though). I prefer to layer the fabric yarn into a small box and pull it out of that as I work, because it puts less of a strain on my hands than pulling it off a ball. If you aren't using it right away, however, I recommend winding it up into a ball or onto a dowel or something of that kind, to prevent tangling.

Whichever method you use, I recommend trimming off the inevitable frayed threads first. Just strip them off the sides by hand and when you encounter resistance, trim them with the scissors, close to the fabric. The tangled threads can then be used to stuff small toys.


Sunday 14 July 2013

Recycling socks

I have a habit of throwing all my single socks and socks with holes into a basket and keeping them, the former because many of my black socks are the same type and I like to have spares, and the latter because some time ago I acquired the darning mushroom shown on the left. I wanted to try and see if I could use it to repair some of my favourite fancy socks.

Eventually, even with many of the single socks paired off, the basket filled with coloured socks with holes and black socks that either had holes or couldn't be paired off. I looked at it one day and came to the sudden conclusion that although some of my favourite coloured socks had ended up in there, it might still be years before I felt like sitting down and repairing
old socks, especially ones from which, it turned out, there exuded a slight whiff of sweaty feet despite them being supposedly clean. So I decided to use them for something else instead.

I did a web search for upcycling projects using old socks and came across instructions on how to make sock yarn - sarn - which looked interesting. I already knew how to make fabric yarn (I wonder if English-speaking crafters call it "farn" in keeping with sarn and plarn?), but had not considered making it out of socks. But why not?

It also gave me an idea and I sat down to make sarn from the approximately 30 or so socks that I had accumulated. Now I just have to get going with my project: to use my slightly smelly old socks to crochet...
what else:
slippers.

I will report back when they're done.


Sunday 9 June 2013

Bra-making experiment

I have been quite frustrated by bras ever since I began to use them. I never feel like I can breathe properly when I have a bra on, in 15 years I have found only two (!) pairs with straps that didn't keep sliding off my shoulders all the time, and the cup sizes confuse me. I have bras with cup sizes ranging from C to E, and they all fit my breasts.

I go to work wearing one I bought after a fitting, and it's probably the best bra I have ever owned. It also cost an arm and a leg. It is highly structured and has underwires and while it doesn't slide around at all or ride up in the back, it does affect my breathing, which I find a bit scary.

At home I like to slip on a bralette which allows me to breathe freely while still giving some support. I used to have three of these, all the same model in different colours, with front closures and so soft and comfortable that I have slept in them without problems. I bought them in the USA many years ago and have never been able to find their equal at home.


But all good things must come to an end. They gave up the ghost one after the other, developing holes under the arms and going grungy on me. So I decided to make me some new ones.


I found some thick, soft stretch jersey at my new favourite fabric shop (which unfortunately is closing at the end of the month) and decided to experiment.

I took apart the less damaged of the two remaining bralettes and used that as a pattern. I also saved the hook- and eye closure to reuse, as the colours were close enough.

I first wrote down a description of the construction and as I took it apart, I noted down in which order things had to be done. I then set to work with scissors, fabric, thread and sewing machine and by the end of about an hour I had a bralette which I think is considerably prettier than the original:


I did change three things about the original design: 
  • I only used a single layer for the cups, instead of two, since the fabric is pretty thick.
  • I made the back in one piece because it was obvious that the centre seam was unnecessary.
  • The third change was unplanned but necessary: The original bralette had become stretched out of shape by heavy wear, which made the pattern unreliable, and to top this I couldn't find the walking foot for the sewing machine (a good thing to have when sewing stretch fabrics), so the edges got a bit stretched when I was doing the hemming. Therefore I found a bit of gaping in places along the upper edges, which I fixed by making dart seams, two in the back and two in the front. 

The new bralette is a pretty good fit, but the cups are a bit small. That's okay though: I have plenty more fabric and plan to make another with bigger cups. I even think that if I make it with a double layer of fabric in the cups, it may have enough hold for me to wear it outside the house.


Now I intend to begin my next experiment: To make my own panties. Just look at that fabric. I even found underwear elastic in matching colours:


Postscript, added June 10:
I wore it to work, and it hardly felt as if I was wearing one at all. However, when I went shopping during my lunch break both breasts popped out from under the bralette when I reached up to get down something I wanted to buy (thank goodness I was wearing a tunic and not a tight sweater). The next one will have a) bigger cups and b) stiffer elastic.

Monday 3 June 2013

Project: Red Velour Spaghetti Scarf

Click to enlarge

While rummaging in the hat box where I keep my doll-making supplies, I dug up a length of red stretch velour. It was probably a remnant that I bought to make doll clothes out of, but since I was not really in the mood to make doll clothes, I decided to try out a scarf-making method I came across on the web and pinned to my clothes sewing board on Pinterest.

The original is for a spaghetti scarf made out of an old t-shirt, but stretch velour has the same properties as t-shirt jersey, in that it rolls up in exactly the same manner when you cut it into lengths and then pull on it. I started by squaring up the piece and ended up with a length approximately 150 cm long and 45 cm wide. I then sewed the ends together, using a zig-zag stitch to get some give in it. I could actually have stopped there and simply used it as a long cowl scarf. Because the fabric looks quite different in the back and front and would therefore show the seam quite clearly, it isn‘t really suitable for an infinity scarf, but it drapes just like one.

Click to enlarge
 I wanted a solid section that could be drawn over the head and a spaghetti section that would dangle and drape nicely, and so I measured the approximate length from one shoulder to the other, over the head, and marked that with a couple of pins. I then laid out the doubled fabric piece and cut to that mark. I then gently but firmly stretched each length to make the edges roll up and voila: a half-solid, half-spaghetti scarf.

Sunday 2 June 2013

Project: Recycled blue tote bag

(Click any image to enlarge). Here is my latest project.

I didn't have anything specific to do yesterday and started looking for something to occupy my time (unusually for me, I didn't feel like reading). Then I remembered this embroidered blue Indian handbag and decided to make it the focus of a project:

The handbag
 I bought it second hand a couple of years ago, but because parts of it were too tatty and worn for me to want to use it as a handbag, I had the notion of cutting it up and using the least worn parts in a crazy quilt. However, I then forgot about it and it ended up packed away with some fabrics I was saving up to use in quilting.
The curtain
I started rummaging in the old sea-chest I use for storing my fabrics and where I was sure I had put the bag, but first I came across a length of denim café curtain I had bought an even longer time ago, intending to use it to make tote bags and table mats and possibly a denim rag quilt if there was any fabric left. All that got made of that project was a single tote bag that I gave to my mother, that she still uses. It has now, about 6 years after I made it, lost the "brand-new jeans" look and is beginning to look interestingly faded and worn.

The handbag lining turned into an inner pocket
Also in the chest was the handbag. I noticed how the blue of the bag fit nicely with the blue of the denim, with the shiny, patterned and embroidered viscose making a nice contrast with the dull, pristine indigo of the denim.

How the strap is sewn on
I set to work. I cut up the bag, removed the lining and sewed the back to the front. I cut a piece of the curtain to the right size (removing the hanging loops) and sewed it all together, adding some cream trim to lighten it up. The front panel of the handbag became an outside pocket, with the back panel as the pocket lining. The inside lining became an inside pocket for the tote,and the strap became a strap for the tote.

Squaring up the bottom
I used the thick, wide hem of the curtain as the bottom part of the bag and squared it up to form a flat bottom.

The result is somewhere between a handbag and a tote bag, but since it has a shoulder strap and no handles I prefer to call it a tote. I will probably use it as a book bag:


Tuesday 28 May 2013