You may have noticed that the sock yarn I wrote about in my last post was shown reposing in a fabric basket? Well, I made that basket, and I also made the yarn. These baskets are super easy to make and you only need to know three basic crochet stitches to make them: chain stitch, single crochet and double crochet (I'm using the American terms here. Click
here to see the equivalent British terms). In fact you only need to know two stitches if you can make a
magic ring, and only one stitch if you can make a magic
ring and want to skip the scalloped edging. (I ran into some problems with the magic ring - the fabric wouldn't cooperate and so I ended up doing it differently, but maybe you can do better).
A couple of weekends ago I sat down with an old duvet cover, a pair of scissors and a seam ripper, because I intended
to use every last centimetre of the fabric. Actually, I ended up
cutting off the side seams because they had white selvedges, but other
than that I did use every cm.
Anyway, I tore it down into strips to make fabric yarn - and last weekend I made the basket from about half the yarn and will either make another basket from the rest, or I might make several fabric trivets or a small floor mat from the rest.
This post will be in two parts: How to make fabric yarn, and how to make the basket.
To make fabric yarn:
You can make fabric yarn out of any kind of fabric that can
be torn or cut into strips, as long as it isn't unwieldy in some way, for example very stiff or thick or liable to easily fray into shreds (e.g. fake fur, some types of brocade and very coarsely woven fabrics). If you plan to make lots of it, I recommend
using something that can be torn easily, because tearing is
faster (and more satisfying) than cutting and for woven fabrics means
there will be less
fraying than if it is cut. I used the aforesaid duvet cover, which was
100% cotton, but linen and rayon and blends thereof will also tear easily (as long as it isn't stretch fabric, in which case I'm afraid you'll have to use scissors).
If you plan to use velvet, felt, fleece or knit fabrics, e.g. jersey, you will need to
cut it. You don't even have to be content with
making
fabric yarn: you could just as easily make
plarn or use old pantyhose and/or nylon stockings. I, however, am going to give instructions for making fabric yarn from tearable fabrics.
 |
Selvedges.
Folks: This is what happens when you always wash your duvet
covers right side out: lint collects along the seams |
New fabrics will inevitably have selvedges. Often they are the same colour as the fabric, in which case just use them as part of the yarn, but if they're a different colour you may want to cut or tear them off and discard them or use them for something else.
If you're making this a true recycling project as I did, e.g. by using a duvet cover, a bed sheet or an old tablecloth, chances are your fabric will have hems and possibly selvedges (which will generally be a part of a hem). For selvedges, see the above advice, but if there are hems you need to rip out the seams and unfold the hems (you might need to iron them out).
It is generally best to cut the fabric generously, because the narrower the strips are, the more they will be liable to tear when you start working with them. For this project, the strips were about 2 cm (3/4 inch) wide. If you use the imperial measurement system, just round that up to an inch. Measure the width of the first strip (I use the width of two fingers as a gauge) and make a cut about 5
cm long. Then firmly grip each side of the cut and start tearing. Stop around 2 cm from the end and make another cut 2 cm from the first tear and repeat until you run out of fabric. You can trim the points at the turns, but they will generally disappear into the crocheted piece and those that don't can be trimmed after the fact. (If you plan to use the fabric yarn for weaving, I recommend rounding the points, as they will be much more visible than in crochet).
 |
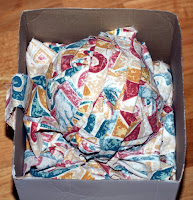
This is about 1/4 of the duvet cover.
The whole thing would have made a ball
as big as a basketball. |
Now it's up to you whether you wind the fabric yarn into balls or not. If you want balls, you may want to shorten the strips because yarn made from a very large piece of fabric, e.g. a large bed sheet, will give you a ball large enough to be difficult to work with (they look cool, though). I prefer to layer the fabric yarn into a small box and pull it out of that as I work, because it puts less of a strain on my hands than pulling it off a ball. If you aren't using it right away, however, I recommend winding it up into a ball or onto a dowel or something of that kind, to prevent tangling.
Whichever method you use, I recommend trimming off the inevitable frayed threads first. Just strip them off the sides by hand and when you encounter resistance, trim them with the scissors, close to the fabric. The tangled threads can then be used to stuff small toys.


 I have a habit of throwing all my single socks and socks with holes into a basket and keeping them, the former because many of my black socks are the same type and I like to have spares, and the latter because some time ago I acquired the darning mushroom shown on the left. I wanted to try and see if I could use it to repair some of my favourite fancy socks.